Out of Home Placement Plan Document Tab
Key:
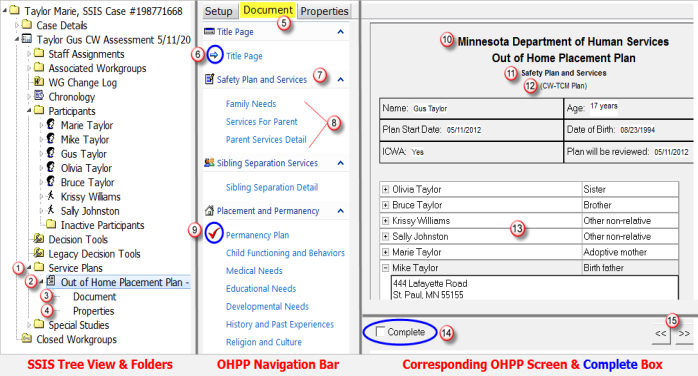
- Expanded Service Plans folder in the Tree View
- Specific Service Plan: Out-of-Home Placement Plan (Safety)
- Document node specific to the OHPP (Safety) reflected above
- Properties node specific to the OHPP (Safety) reflected above
- Navigation bar within the Document Tab of the OHPP
- Blue arrow indicates the OHPP screen displaying to the right.
- Primary node of the OHPP Navigation bar
- Sub-screen(s) of the OHPP Navigation bar
- Red checkmark indicates Complete box was checked on this screen.
It also indicates that this screen will print on the OHPP document.
- Title Page: First screen displaying on each OHPP Document tab
- Type of OHPP (Safety Plan and Services is shown)
- (CW-TCM Plan) displays if Yes is selected in CW-TCM Setup tab field
- Selected Relatives from Setup tab (merges from Relationships folder)
- Complete box: Must be checked for this section of the plan to print
- Double arrows: Navigate forward or back by one screen.
Navigation also occurs by clicking on Navigation bar selections.
Each child in placement receives his/her own OHPP which must be reviewed with the child (as applicable) and family prior to the child’s 180th day in placement. Given Concurrent Permanency Planning, an OHPP should be reviewed more frequently.
Each OHPP has similar Document tab screens, while other screens are specific to the type of OHPP selected. Both the Setup and Document tabs are editable while the OHPP is in Draft status. Ideally, signatures are obtained by the 30th day of placement, and the OHPP is changed from Draft to Active status.
![]() To Open the Document tab of any OHP Plan:
To Open the Document tab of any OHP Plan:
- Ensure the Setup tab is complete and saved.
- Click on the Document tab.
- The Document tab opens to the Title Page.
Each OHP Plan opens to a Title Page. The Title Page displays the type of OHP Plan selected, the CW-TCM heading (if selected on the Setup tab to indicate this is the identified CW-TCM Plan), demographic information about the identified child, and a grid listing Relatives to the child (and an associated address if previously entered).
Hint: Relatives may be related by blood, marriage, adoption – or completely unrelated. Persons display as a Relative if a Relationship was previously entered to the identified child – AND – that individual’s name was selected on the Setup tab.
Document tab screens display many Editor boxes. You may click on the blue E to open the full screen Editor, or click directly in the Editor box to type text. Right-clicking on text typed directly into a text box displays both Spellcheck and some Autocorrect features.
Warning: Changes made to the appearance of text in one text box will not copy to the next text box; text changes need to be made individually within each Editor box or the text default displays.
Document Tab – Family Needs Screen

![]() To Complete screens beneath the Document tab of any OHPP:
To Complete screens beneath the Document tab of any OHPP:
- Click in all check boxes that reflect answers to questions regarding the child,
the family, and the resource family. - Click on the Editor button, or type text directly into the Editor box, to answer the questions on the OHPP screens.
![]() Warning: Editor boxes displaying below check boxes typically have a check box marked Other displaying at the end of the list. The Other check box is not only reflective of any other category the caseworker wishes to add to the checklist, it is also reflective of the checklist in its entirety. Therefore, text may be entered regarding any boxes checked on the checklist – not just the Other check box.
Warning: Editor boxes displaying below check boxes typically have a check box marked Other displaying at the end of the list. The Other check box is not only reflective of any other category the caseworker wishes to add to the checklist, it is also reflective of the checklist in its entirety. Therefore, text may be entered regarding any boxes checked on the checklist – not just the Other check box.
- When the fields on a screen you wish to print are complete, click the Complete check box at the bottom of the screen.
![]() Warning: Even if text has been typed in each Editor box, and selections made in check boxes, the screen will not print on the OHPP unless a checkmark displays in the Complete box.
Warning: Even if text has been typed in each Editor box, and selections made in check boxes, the screen will not print on the OHPP unless a checkmark displays in the Complete box.
Hint: If the Complete box is not checked, the information is still saved on the screen. The caseworker may return to the screen, click Complete, and the screen will then print.
Document Tab – Services For Parent Screen
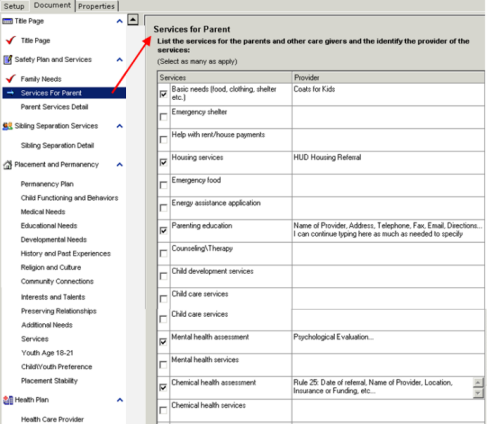
Some screens on the OHPP’s have grids composed of check boxes and smaller text fields. The amount of text you may enter in an Editor box is unlimited, but these smaller text fields allow only a finite amount of text.
- For example, select the check boxes next to the services offered to the parent(s) in the Services for Parent grid.
- Click inside the corresponding text field to enter additional information regarding the provision of the service. Examples may include an address, email, website or fax, a schedule, transportation details, or other information.
Document Tab –Permanency Plan Screen and Field
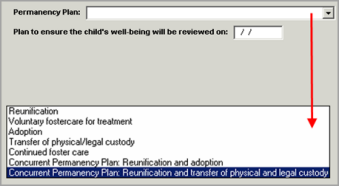
- Enter selections in applicable drop-down menu fields on Document tab screens. (Permanency Plan field is shown above.)
Document Tab –Medical Needs Screen – Merge Fields
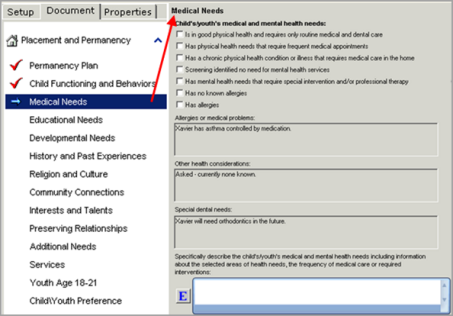
- Review all merge fields to ensure that data accurately displays.
(New Other Health fields are shown above).
Document Tab – Interests and Talents Screen – Check boxes and Editor Boxes
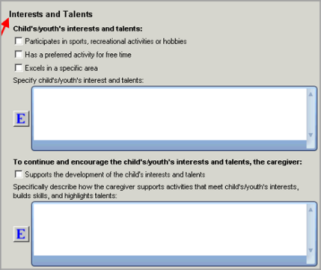
Hint: In general, Editor boxes displaying beneath check boxes are provided so that additional information and explanation can be entered regarding the check boxes selected above the Editor box, and/or to enter statements not provided by a check box.
Document Tab – Signature Page
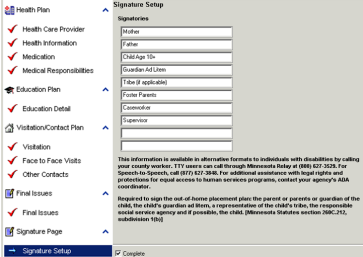
- Type the names of required signers in the Signature Setup screen.
- Save the OHP Plan.
Next Job Aid: OHPP Action Menu Features
 Report this page